Setting up e-mail sending via SMTP for your website

On our shared hosting servers, PHP's mail() function has been disabled since November 2014 to fight the sending of spam. Since then, your website has needed an authenticated SMTP connection to send e-mails. On a virtual or dedicated server, you can also choose to disable PHP's mail() function and use an authenticated SMTP connection to prevent spam. Here is how to do it, depending on the CMS you use.
Important note: in each case below, we show the SMTP settings to use when e-mails are sent from an e-mail address that exists on our server, and therefore from our servers. If you want to use an external address (gmail.com, yahoo.com, outlook.com…), you will need to use the SMTP settings of that e-mail provider instead.
Contents
WordPress
Joomla
Prestashop
Drupal
SPIP
Nextcloud
Website without a CMS
WordPress:
By default, WordPress uses one of its own functions: wp_mail(). This function relies on PHP's mail() function by default.
The easiest way to use SMTP is to install a plugin called "SMTP Mailer" and configure it with the details of an e-mail address. This address is only used to send the e-mails: you can receive them at any address you like.
Once the plugin is installed, go to "Settings" >> "SMTP Mailer" and configure it as follows:
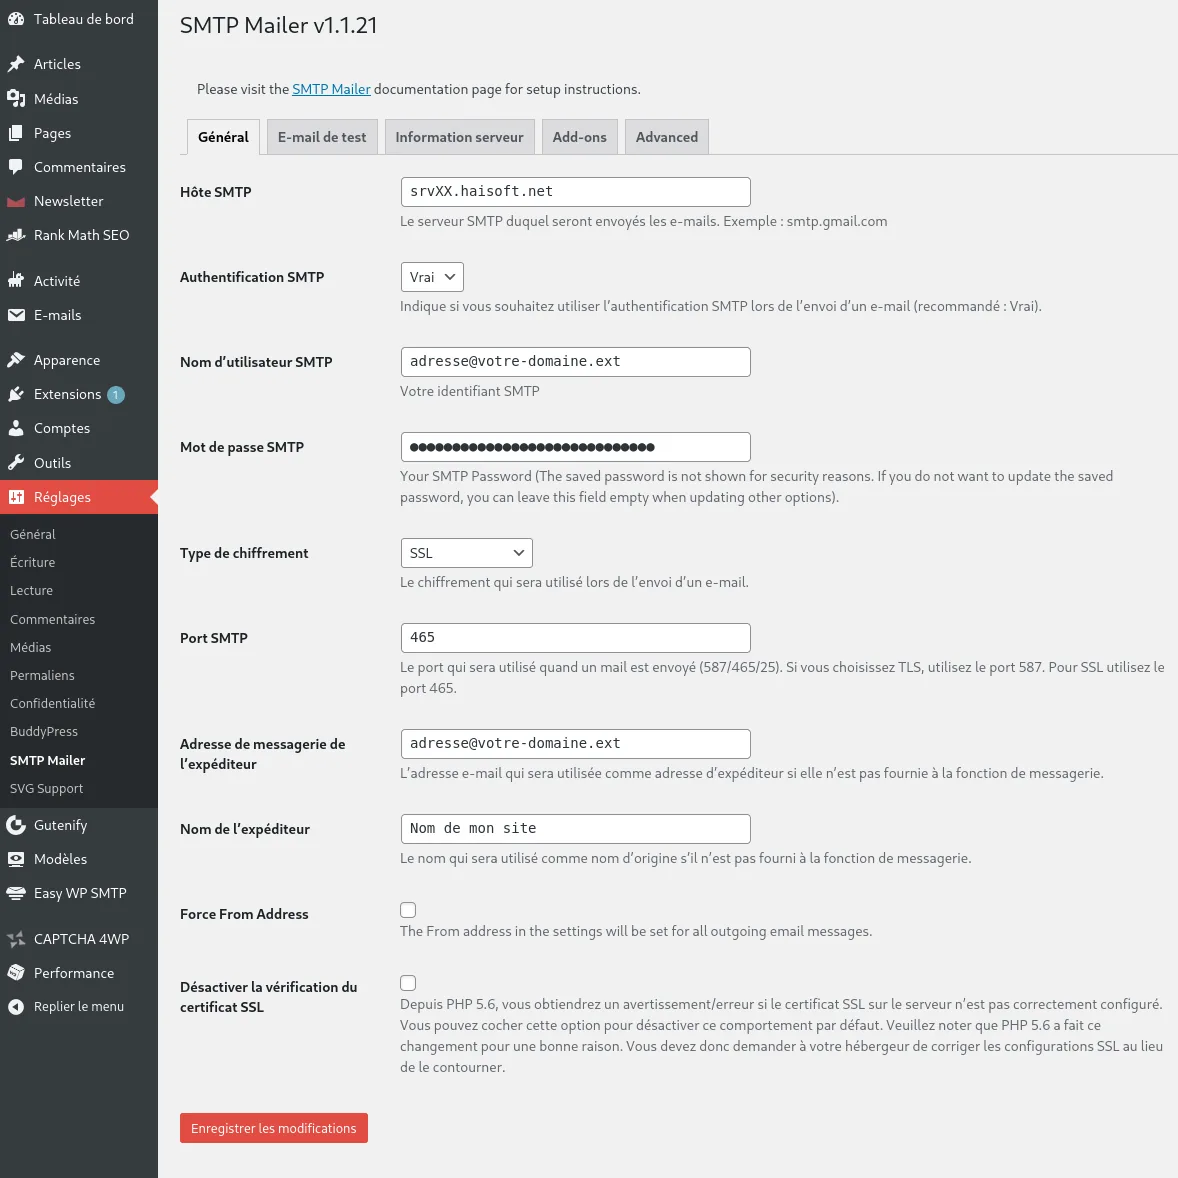
– Enter the name of the server linked to your hosting in "SMTP Host" (replace srvXX.haisoft.net with the name of the server that hosts your e-mails).
– Enable SMTP authentication (choose "True").
– Enter your e-mail address in the "SMTP Username" and "From Email Address" fields.
– Enter the e-mail address's password in "SMTP Password".
– Choose "SSL" as the type of encryption.
– Enter "465" as the SMTP port.
– Click "Save Changes". You can also test sending using the test form in the second tab, "Test Email".
Joomla:
No extra plugin is needed here: Joomla supports SMTP natively!
In the Joomla administration panel, go to "System" >> "Global Configuration", then open the "Server" tab.
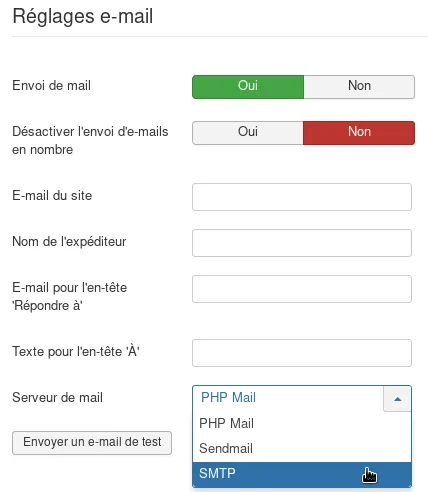
In the "Mail Settings" section, first change the "Mailer" setting from "PHP Mail" to "SMTP", then configure it as follows:
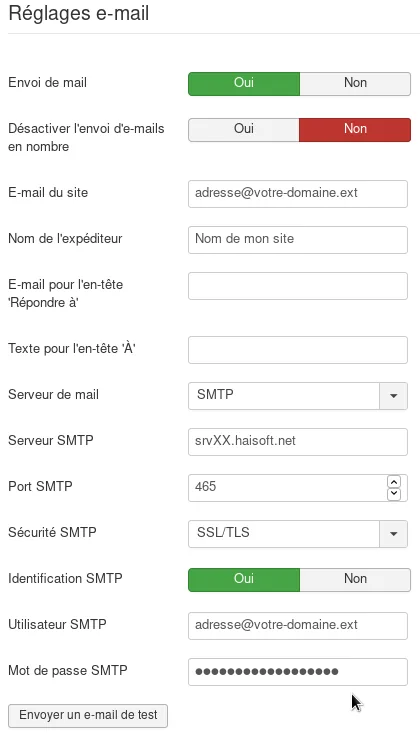
– Enable "SMTP Authentication" (this displays the "SMTP Username" and "SMTP Password" fields).
– Enter your e-mail address in the "From Email" and "SMTP Username" fields.
– Enter the name of the server linked to your hosting in "SMTP Host" (replace srvXX.haisoft.net with the name of the server that hosts your e-mails).
– Enter "465" as the SMTP port.
– In "SMTP Security", choose "SSL/TLS".
– Enter the e-mail address's password in "SMTP Password".
– Click "Save" at the top of the Joomla settings page. You can also test sending using the "Send Test Mail" button.
Prestashop:
Prestashop also supports SMTP natively. To configure it, go to "Advanced Parameters" >> "E-mail".
Among the first three options, choose "Set my own SMTP parameters": a new form then appears. Configure it as follows:
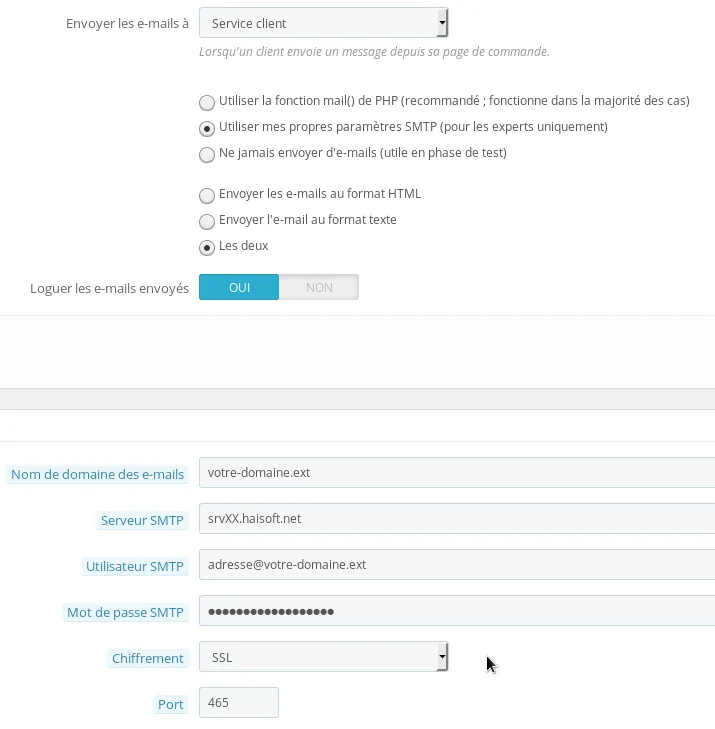
– Enter your domain in "Mail domain name".
– Enter the name of the server linked to your hosting in "SMTP server" (replace srvXX.haisoft.net with the name of the server that hosts your e-mails).
– Enter your e-mail address in the "SMTP username" field.
– Enter the e-mail address's password in "SMTP password".
– Choose "SSL" as the encryption type.
– Enter "465" as the port.
– Click "Save" at the bottom right of the form. You can also test sending using the "Send a test email" button.
Drupal:
– First, go to Drupal's "Configuration" menu, then to "Basic site settings". Check that the e-mail address shown in "Email address" is the one you want to send e-mails from.
As Drupal does not support SMTP natively, we then need to install a plugin.
– First, download the "SMTP Authentication Support" plugin to your computer. In the "Extend" menu, click "Install new module", click "Browse", select the file you have just downloaded, then click "Install". (You can also paste the installation link instead of downloading the module and uploading it again.)
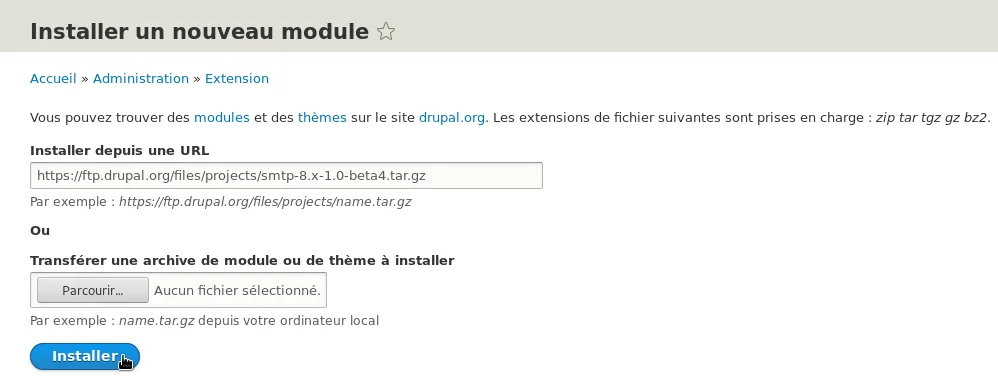
Once the installation is complete, click "Enable newly added modules" in the window that appears. In the list of modules, tick the box for the "SMTP Authentication Support" plugin and click "Install".
– Go to Drupal's "Configuration" menu, then to the new "SMTP Authentication Support" menu. Tick "On" under "Turn this module on or off", then configure it as follows:
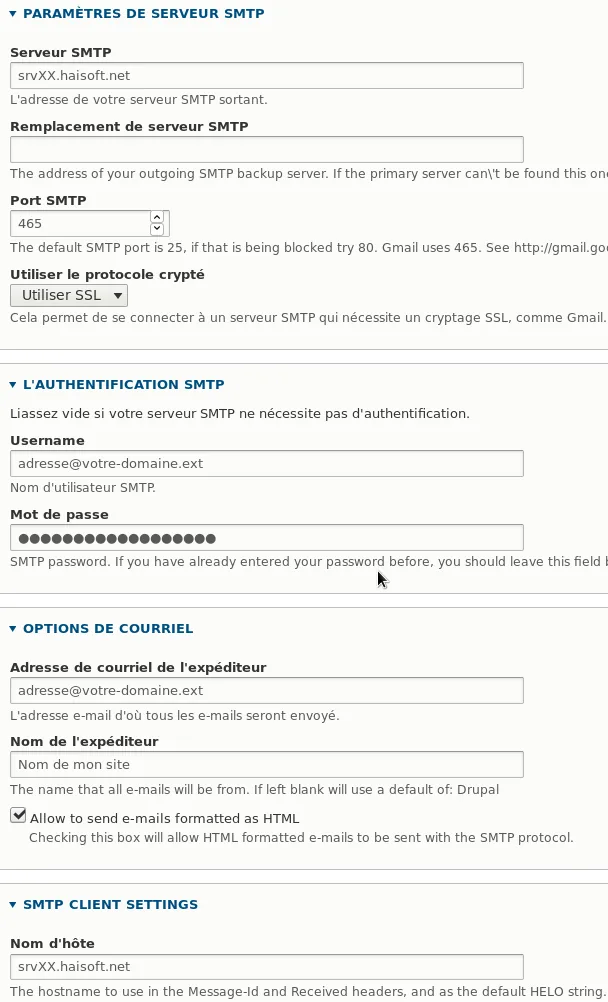
– Enter the name of the server linked to your hosting in "SMTP server" and "Hostname" (replace srvXX.haisoft.net with the name of the server that hosts your e-mails).
– Enter "465" as the SMTP port.
– In "Use encrypted protocol", choose "Use SSL".
– Enter your e-mail address in the "Username" and "Email from address" fields.
– Enter the e-mail address's password in "Password".
– Click "Save configuration" at the bottom of the page. You can also test sending by entering an e-mail address in the "Send a test email" field and clicking "Save configuration" again.
SPIP:
Go to the "Configuration" >> "Plugin management" section of the site. Click the "Add plugins" tab, then the "Add" button at the bottom of the page.
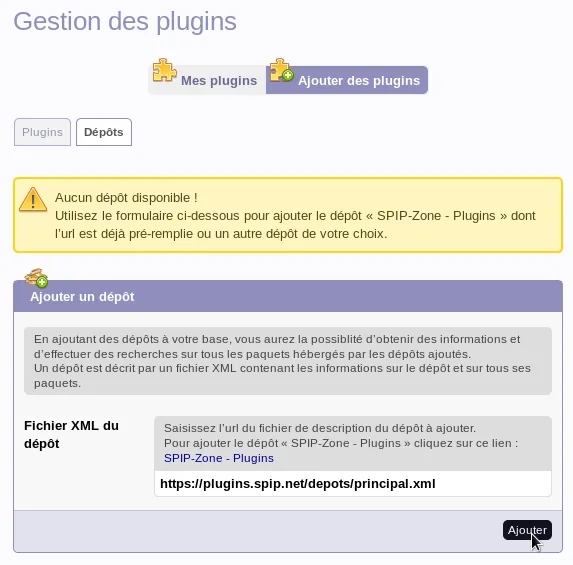
Click the "Plugins" sub-tab (to the left of "Repositories"). Search for the "Facteur" plugin. Tick the box next to it and click "Download and activate".
Once the plugin is installed and activated, go to the new "Facteur" sub-menu in the "Configuration" menu.
The first option, "Default sending address", can be changed in "Configuration" >> "Site identity" if necessary.
Configure the remaining options as follows:
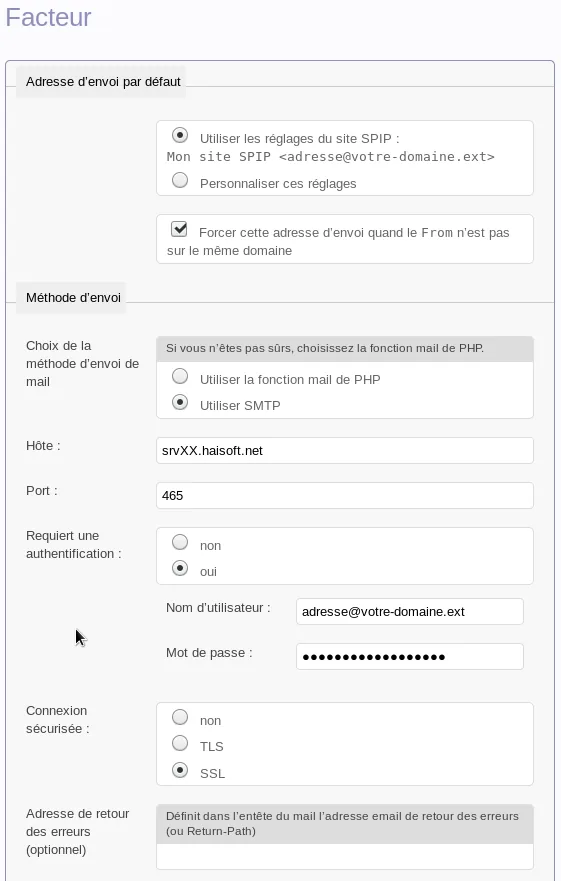
– Select "Use SMTP".
– Enter the name of the server linked to your hosting in "Host" (replace srvXX.haisoft.net with the name of the server that hosts your e-mails).
– Enter "465" as the SMTP port.
– Choose "Yes" for "Requires authentication".
– Enter your e-mail address in the "Username" field.
– Enter the e-mail address's password in "Password".
– Choose "SSL" for "Secure connection".
– Click "Submit" to save the settings. You can also test sending using the test form on the same page.
Nextcloud:
Log in as an administrator and go to "Settings". In the menu on the left, under "Administration", click "Basic settings". Then fill in the "Email server" form as follows:
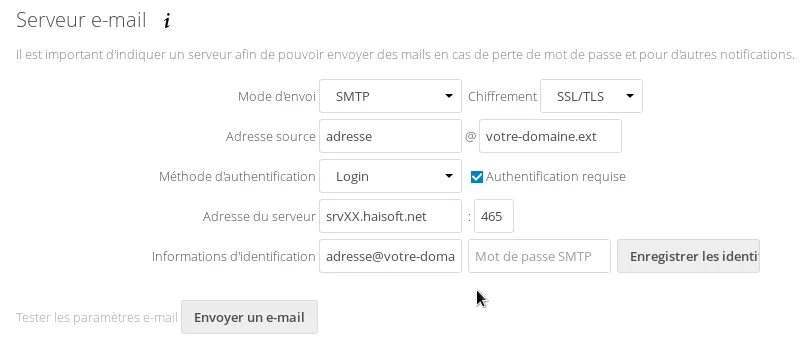
– Choose "SMTP" as the "Send mode" and "SSL/TLS" as the "Encryption".
– Enter your e-mail address in the "From address" field.
– Choose "Login" as the "Authentication method" and tick "Authentication required".
– Enter the name of the server linked to your hosting in "Server address", and "465" in the box next to it (SMTP port) (replace srvXX.haisoft.net with the name of the server that hosts your e-mails).
– Under "Credentials", enter your e-mail address in the "SMTP Username" field and the e-mail address's password in "SMTP Password".
– Click "Store credentials". You can also test sending using the "Send email" button.
Website without a CMS:
Your website may not be based on a CMS – for example, a site you developed yourself. To adapt how it sends e-mail, you can use PHPMailer or the Perl module "Net::SMTP".
For details, please see our detailed documentation on our Wiki (in French).