What to do after installing WordPress

That's it: WordPress is installed on your hosting. You may now find yourself with a post already created, preinstalled plugins and themes, e-mails that don't get sent… In this article we will go through several important points to make sure you get the most out of WordPress and avoid certain problems. Let's get started!
Contents
Tidy up
Configure SMTP for sending e-mail
Disable registrations and comments
Prepare your SEO
Secure WordPress
Tidy up
– Once WordPress is installed, several items are already there: a "Hello world!" post, a sample page, a sample comment, some plugins and some themes.
– As for plugins, you can activate Akismet, an anti-spam tool for comments: it will spare you "lovely" spam messages left by bots on your posts…
– Delete anything you don't need: the sample comment/post/page, the "Hello Dolly" plugin and any themes you won't be using (they can be reinstalled from the WordPress themes menu/catalogue).
Configure SMTP for sending e-mail
Your site may well need to send e-mails, whether for a lost password, when a visitor fills in a contact form, or when a security plugin sends an alert…
On our shared servers, PHP's mail() function is disabled for obvious security reasons. By default, WordPress uses one of its own functions, wp_mail(), which in turn relies on PHP's mail() function. The simplest way to use SMTP instead is to install a plugin called "Easy WP SMTP" and configure it with the details of an e-mail address. This address is only used to send the e-mails: you can receive them at any address you like.
Important note: below we describe the SMTP settings to use when e-mails are to be sent from an existing e-mail address on our server, and therefore from our servers. If you want to use an external address (gmail.com, yahoo.fr, free.fr…), you will need to use that e-mail provider's SMTP settings instead.
Here is how to configure the plugin with our SMTP server:
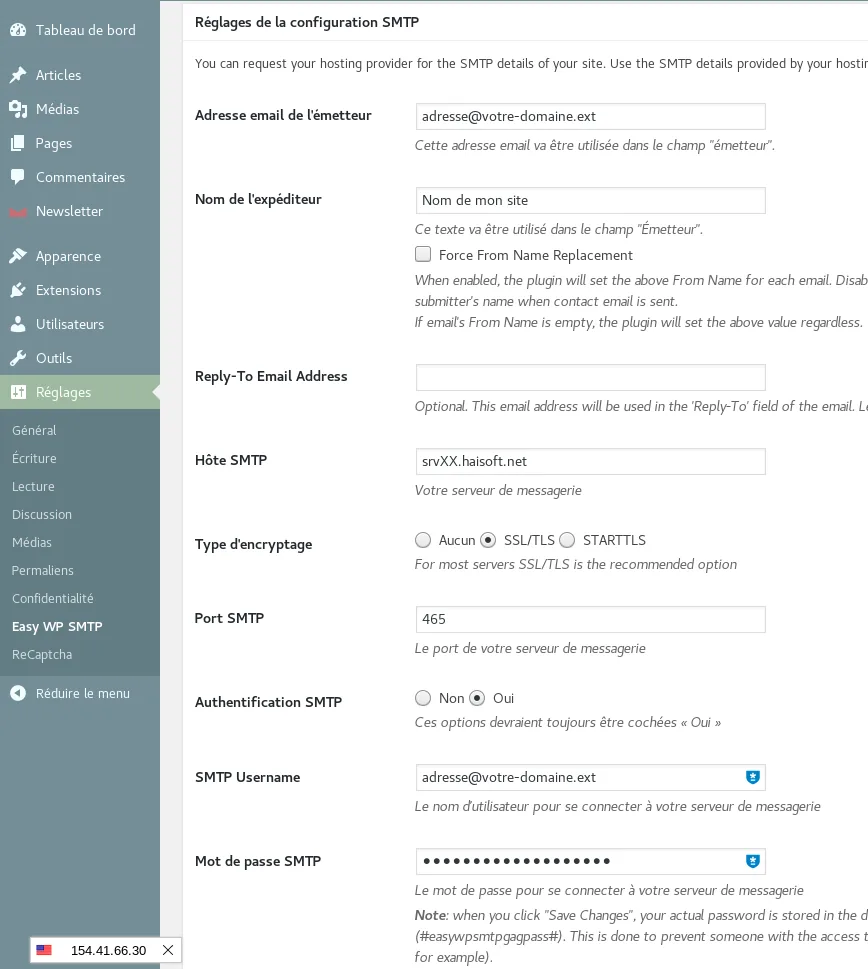
– Go to "Settings" >> "Easy WP SMTP".
– Enter your e-mail address in the "From Email Address" and "SMTP Username" fields.
– Enter the name of the server associated with your hosting in "SMTP Host".
– Choose "SSL/TLS" as the encryption type.
– Enter "465" as the SMTP port.
– Enable SMTP authentication.
– Enter the e-mail address's password in "SMTP Password".
– Click "Save Changes". You can also test sending with the test form on the same page.
Disable user registration and comments
If your site is not meant to be open to visitor registrations, you can disable this option under "Settings" >> "General" by unticking the "Anyone can register" box.
If your site is not a blog, or if you don't want visitors to leave comments on your site, you can disable them.
This can even be done post by post or page by page: handy if you only want to disable comments on some posts/pages rather than all of them. Here's how:
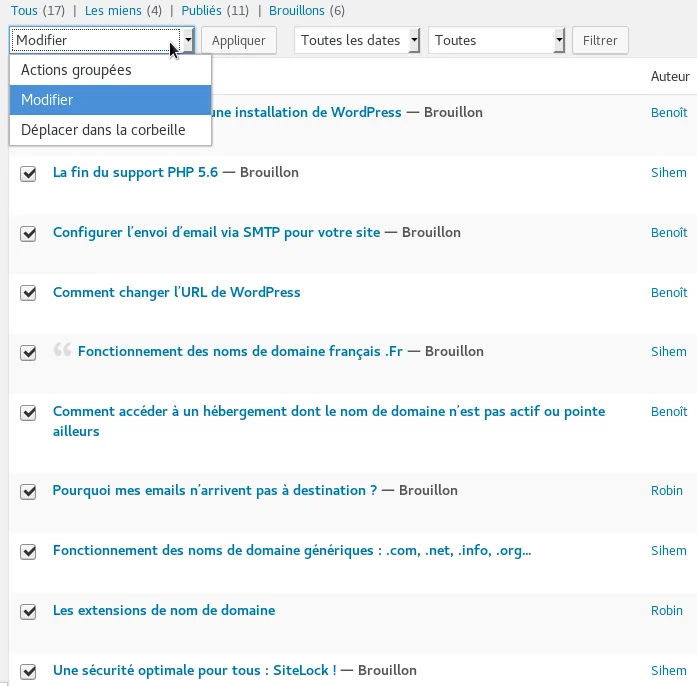
In the "Posts" menu, tick the boxes of the posts for which you want to disable comments, then choose "Edit" from the "Bulk actions" drop-down list and click "Apply".
(You can even get a sneak peek at some of our upcoming articles here!)
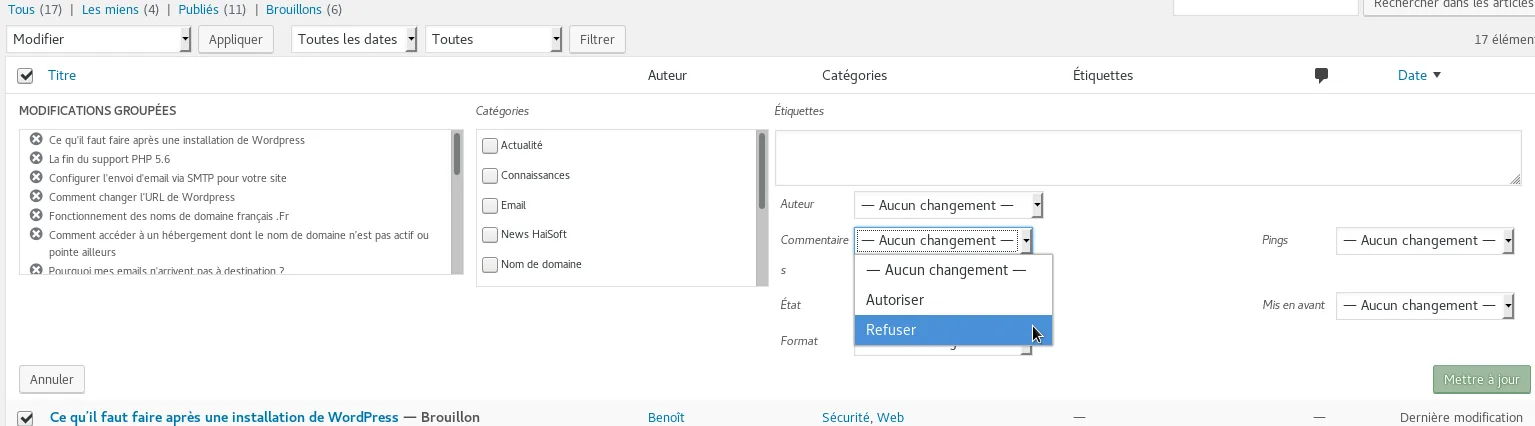
In the panel that appears, choose "Do not allow" in the "Comments" list, then confirm the changes with the "Update" button.
You can follow the same steps for pages.
If you want to disable comments across the whole site, without having to repeat this for every new post/page, follow these steps for your existing posts/pages and also untick the "Allow people to submit comments on new posts" option in the "Settings" >> "Discussion" menu.
Prepare your SEO
So that your site can be indexed by search engine bots, make sure the "Discourage search engines from indexing this site" option is unticked under "Settings" >> "Reading".
You can also install the "All in One SEO Pack" or "Yoast SEO" plugin to optimise your search engine ranking, but choosing a good "SEO Optimized" theme is often enough.
Also choose the structure you want for your links in the "Settings" >> "Permalinks" menu:
We recommend the "Post name" option: links containing the name of a post are "cleaner" than plain numbers.
Secure WordPress
We recommend installing the "Wordfence" plugin to strengthen your security. Once it is installed and activated (and you have completed the initial wizard), a new "Wordfence" menu appears in the WordPress sidebar.
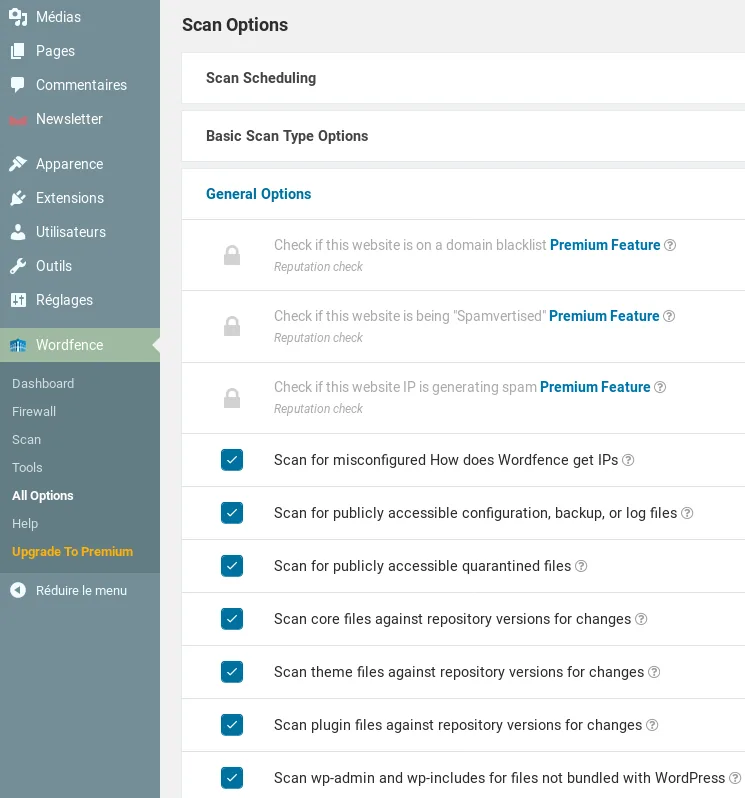
Click "Wordfence" >> "All options". Expand the "General Options" menu under "Scan Options" and tick the "Scan theme files against repository versions for changes" and "Scan plugin files against repository versions for changes" boxes.
You can then run a scan from the menu of the same name. The scan checks for various vulnerabilities and also verifies the integrity of the WordPress, theme and plugin files: in other words, it checks that no file has been modified since the component was installed. If one has, this may indicate an infection.
We also recommend that you have the Plesk control panel detect your WordPress installation, if it hasn't already done so.
Plesk includes a tool, the "WordPress Toolkit", which lets you manage WordPress and its updates from Plesk and apply various security improvements.
To have Plesk detect your WordPress installation: on the page of the domain concerned, click the "WordPress" button. On the page that appears, click "Scan". Once the scan has finished, refresh the page: the list of your WordPress installations is displayed.
Tick the box next to the WordPress installation concerned and click "Check Security".
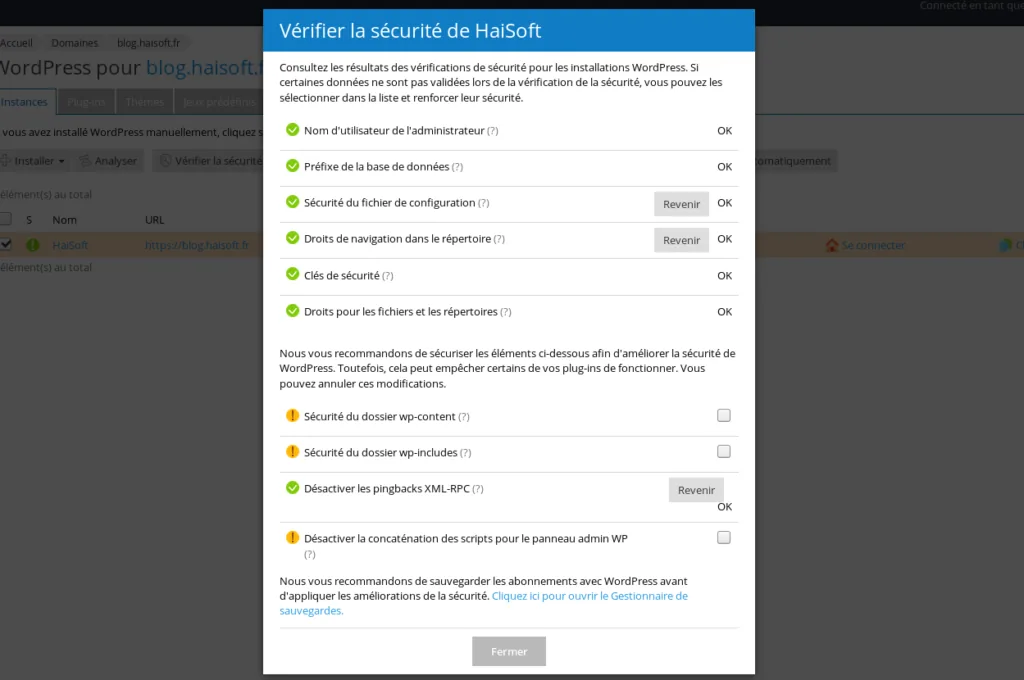
The items marked with a yellow exclamation mark in the screenshot should be applied with caution: some security improvements may be incompatible with certain plugins. Check that your site still works normally after applying each one (no inaccessible pages); if not, click "Revert" to undo the changes.
That's the end of this guide! Feel free to let us know if you think other important items could be added to this list.
Need help? Our technical team is available 7 days a week for any request via support ticket.